
iptables与ipvs区别
service和iptables的关系
service的代理是kube-proxy
kube-proxy运行在所有节点上,它监听apiserver中service和endpoint的变化情况,创建路由规则以提供服务IP和负载均衡功能,简单理解此进程是Service的透明代理兼负载均衡器,其核心功能是将到某个Service的访问请求转发到后端的多个Pod实例上,而kube-proxy底层又是通过iptables和ipvs实现的
iptables原理
Kubernetes从1.2版本开始,将iptables作为kube-proxy的默认模式,iptables模式下的kube-proxy不再起到Proxy的作用,其核心功能:通过API Server的Watch接口实时跟踪Service与Endpoint的变更信息,并更新对应的iptables规则,Client的请求流量则通过iptables的NAT机制"直接路由"到目标Pod
ipvs原理
IPVS在Kubernetes1.11中升级为GA稳定版,IPVS则专门用于高性能负载均衡,并使用更高效的数据结构(Hash表),允许几乎无限的规模扩张,因此被kube-proxy采纳为最新模式
在IPVS模式下,使用iptables的扩展ipset,而不是直接调用iptables来生成规则链。iptables规则链是一个线性的数据结构,ipset则引入了带索引的数据结构,因此当规则很多时,也可以很高效地查找和匹配
可以将ipset简单理解为一个IP(段)的集合,这个集合的内容可以是IP地址、IP网段、端口等,iptables可以直接添加规则对这个“可变的集合”进行操作,这样做的好处在于可以大大减少iptables规则的数量,从而减少性能损耗
kube-proxy ipvs和iptables的异同
iptables与IPVS都是基于Netfilter实现的,但因为定位不同,二者有着本质的差别:iptables是为防火墙而设计的;IPVS则专门用于高性能负载均衡,并使用更高效的数据结构(Hash表),允许几乎无限的规模扩张
与iptables相比,IPVS拥有以下明显优势:
- 为大型集群提供了更好的可扩展性和性能
- 支持比iptables更复杂的复制均衡算法(最小负载、最少连接、加权等)
- 支持服务器健康检查和连接重试等功能
- 可以动态修改ipset的集合,即使iptables的规则正在使用这个集合
Iptables:
- 灵活,功能强大
- 规则遍历匹配和更新,呈线性时延
IPVS: - 工作在内核态,有更好的性能
- 调度算法丰富:rr,wwr,lc,wlc,ip hash...
k8s集群中service和kube-proxy
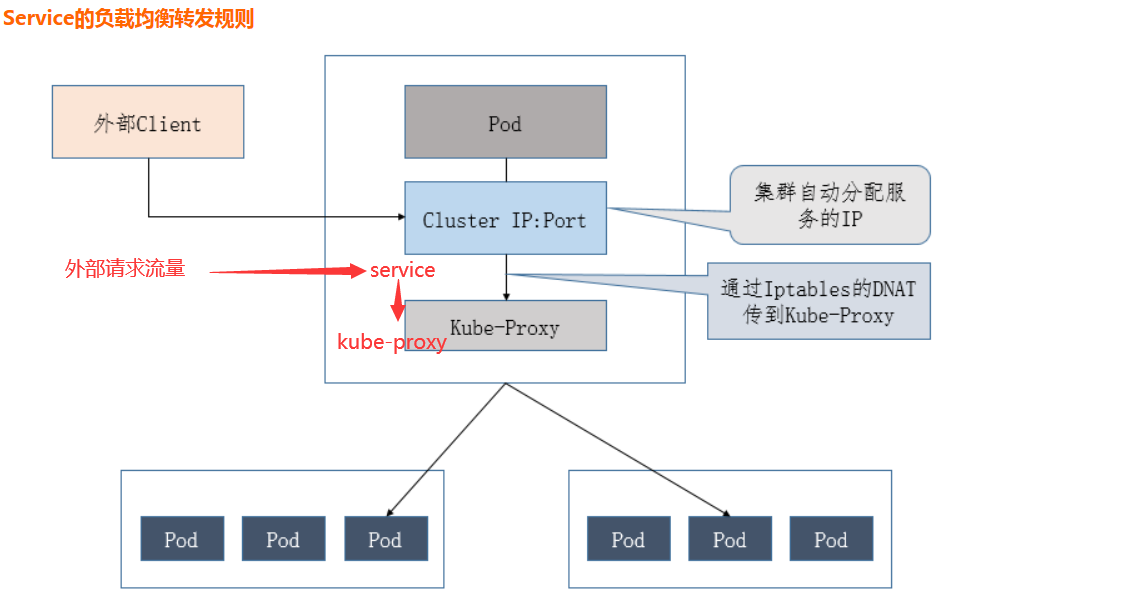
访问Service的请求,不论是Cluster IP+TargetPort的方式;还是用Node节点IP+NodePort的方式,都被Node节点的Iptables规则重定向到Kube-proxy监听Service服务代理端口,kube-proxy接收到Service的访问请求后,根据负载策略,转发到后端的Pod
查看某一节点kube-proxy的日志
[root@k8s08 logs]# tail -f /opt/kubernetes/logs/kube-proxy.INFO
...
W0214 15:10:22.852354   26185 server_others.go:559] Unknown proxy mode "", assuming iptables proxy
I0214 15:10:22.868205   26185 node.go:136] Successfully retrieved node IP: 10.0.0.209
I0214 15:10:22.868221   26185 server_others.go:183] DetectLocalMode: 'ClusterCIDR'
I0214 15:10:22.868231   26185 server_others.go:186] Using iptables Proxier.
I0214 15:10:22.868466   26185 server.go:583] Version: v1.18.4
I0214 15:10:22.868836   26185 conntrack.go:52] Setting nf_conntrack_max to 524288
...
查看所有的规则
[root@k8s08 ~]# iptables -vnL
Chain INPUT (policy ACCEPT 22501 packets, 7446K bytes)
 pkts bytes target     prot opt in     out     source               destination
3399M 3300G KUBE-FIREWALL  all  --  *      *       0.0.0.0/0            0.0.0.0/0
1759M  376G KUBE-SERVICES  all  --  *      *       0.0.0.0/0            0.0.0.0/0            ctstate NEW /* kubernetes service portals */
1759M  376G KUBE-EXTERNAL-SERVICES  all  --  *      *       0.0.0.0/0            0.0.0.0/0            ctstate NEW /* kubernetes externally-visible service portals */
...
接收流量
NodePort访问入口规则
[root@k8s-master ~]# kubectl get -n kube-system svc
NAME            TYPE        CLUSTER-IP    EXTERNAL-IP   PORT(S)                   AGE
grafana         NodePort    10.96.0.27    <none>        3000:33609/TCP            4d
kube-dns        ClusterIP   10.96.0.2     <none>        53/UDP,53/TCP,9153/TCP    20d
node-exporter   NodePort    10.96.0.166   <none>        9100:31672/TCP            4d1h
prometheus      NodePort    10.96.0.229   <none>        9090:30003/TCP            4d
[root@k8s-master ~]# iptables -S -t nat |grep 31672
-A KUBE-NODEPORTS -p tcp -m comment --comment "kube-system/node-exporter:http" -m tcp --dport 31672 -j KUBE-MARK-MASQ
-A KUBE-NODEPORTS -p tcp -m comment --comment "kube-system/node-exporter:http" -m tcp --dport 31672 -j KUBE-SVC-XUQUPYZJOC34BVRR
CLUSTER-IP 访问入口规则
[root@k8s-master ~]# iptables -S -t nat |grep 10.96.0.166  (cluster IP)
-A KUBE-SERVICES ! -s 10.96.0.0/24 -d 10.96.0.166/32 -p tcp -m comment --comment "kube-system/node-exporter:http cluster IP" -m tcp --dport 9100 -j KUBE-MARK-MASQ
-A KUBE-SERVICES -d 10.96.0.166/32 -p tcp -m comment --comment "kube-system/node-exporter:http cluster IP" -m tcp --dport 9100 -j KUBE-SVC-XUQUPYZJOC34BVRR
按概率(probability)分配
node-exporter有3个pod副本,负载规则如下
[root@k8s-master ~]# iptables -S -t nat |grep KUBE-SVC-XUQUPYZJOC34BVRR
-N KUBE-SVC-XUQUPYZJOC34BVRR
-A KUBE-NODEPORTS -p tcp -m comment --comment "kube-system/node-exporter:http" -m tcp --dport 31672 -j KUBE-SVC-XUQUPYZJOC34BVRR
-A KUBE-SERVICES -d 10.96.0.166/32 -p tcp -m comment --comment "kube-system/node-exporter:http cluster IP" -m tcp --dport 9100 -j KUBE-SVC-XUQUPYZJOC34BVRR
-A KUBE-SVC-XUQUPYZJOC34BVRR -m comment --comment "kube-system/node-exporter:http" -m statistic --mode random --probability 0.33333333349 -j KUBE-SEP-3NSLY3ENPRKBTMDR
-A KUBE-SVC-XUQUPYZJOC34BVRR -m comment --comment "kube-system/node-exporter:http" -m statistic --mode random --probability 0.50000000000 -j KUBE-SEP-I4CGKMZXT6EHH4XB
-A KUBE-SVC-XUQUPYZJOC34BVRR -m comment --comment "kube-system/node-exporter:http" -j KUBE-SEP-L3VRNJ7CTQC6D2MP
根据分配转发到实际pod中
[root@k8s-master ~]# kubectl get -n kube-system ep
NAME            ENDPOINTS                                                  AGE
grafana         10.244.3.96:3000                                           4d
kube-dns        10.244.2.49:53,10.244.2.50:53,10.244.2.49:53 + 3 more...   20d
node-exporter   10.244.1.90:9100,10.244.2.52:9100,10.244.3.94:9100         4d1h
prometheus      10.244.3.95:9090                                           4d

[root@k8s-master ~]# iptables -S -t nat |grep KUBE-SEP-L3VRNJ7CTQC6D2MP
-N KUBE-SEP-L3VRNJ7CTQC6D2MP
-A KUBE-SEP-L3VRNJ7CTQC6D2MP -s 10.244.3.94/32 -m comment --comment "kube-system/node-exporter:http" -j KUBE-MARK-MASQ
-A KUBE-SEP-L3VRNJ7CTQC6D2MP -p tcp -m comment --comment "kube-system/node-exporter:http" -m tcp -j DNAT --to-destination 10.244.3.94:9100(ep,到达某一节点的具体pod中)
-A KUBE-SVC-XUQUPYZJOC34BVRR -m comment --comment "kube-system/node-exporter:http" -j KUBE-SEP-L3VRNJ7CTQC6D2MP

kube-proxy当前实现了三种代理模式:userspace, iptables, ipvs
- userspace mode: userspace是在用户空间,通过kube-proxy来实现service的代理服务
- iptables mode, 该模式完全利用内核iptables来实现service的代理和LB, 这是K8s在v1.2及之后版本默认模式,API Server 对内(集群中的其他组件)和对外(用户)提供统一的 REST API,其他组件均通过 API Server 进行通信,Controller Manager、Scheduler、Kube-proxy 和 Kubelet 等均通过 API Server watch API 监测资源变化情况,并对资源作相应的操作
- ipvs mode.,在kubernetes 1.8以上的版本中,对于kube-proxy组件增加了除iptables模式和用户模式之外还支持ipvs模式
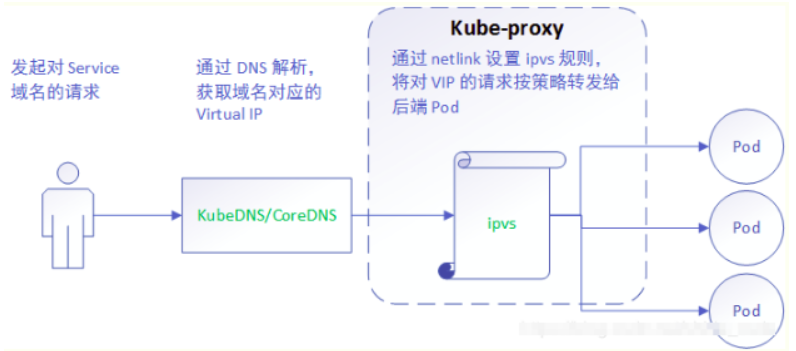
kube-proxy ipvs 是基于 NAT 实现的,通过ipvs的NAT模式,对访问k8s service的请求进行虚IP到POD IP的转发,当创建一个 service 后,kubernetes 会在每个节点上创建一个网卡,同时帮你将 Service IP(VIP) 绑定上,此时相当于每个 Node 都是一个 ds,而其他任何 Node 上的 Pod,甚至是宿主机服务(比如 kube-apiserver 的 6443)都可能成为 rs
与iptables、userspace 模式一样,kube-proxy 依然监听Service以及Endpoints对象的变化, 不过它并不创建反向代理, 也不创建大量的 iptables 规则, 而是通过netlink 创建ipvs规则,并使用k8s Service与Endpoints信息,对所在节点的ipvs规则进行定期同步; netlink 与 iptables 底层都是基于 netfilter 钩子,但是 netlink 由于采用了 hash table 而且直接工作在内核态,在性能上比 iptables 更优
service和endpoints关系
- api-server创建service对象,与service绑定的pod地址:称之为endpoints(kubectl get ep可以查看)
- 服务发现方面:kube-proxy监控service后端endpoint的动态变化,并且维护service和endpoint的映射关系
k8s服务注册(dns),服务发现是service
k8s提供了两种方式进行服务发现, 即环境变量和DNS
环境变量
创建一个Pod的时候,kubelet会在该Pod中注入集群内所有Service的相关环境变量,需要注意要想一个Pod中注入某个Service的环境变量,则必须Service要先比该Pod创建,比如一个ServiceName为redis-master的Service,对应的ClusterIP:Port为10.96.1.23:6379,则其对应的环境变量为
REDIS_MASTER_SERVICE_HOST=10.96.1.23
REDIS_MASTER_SERVICE_PORT=6379
REDIS_MASTER_PORT=tcp://10.96.1.23:6379
REDIS_MASTER_PORT_6379_TCP=tcp://10.96.1.23:6379
REDIS_MASTER_PORT_6379_TCP_PROTO=tcp
REDIS_MASTER_PORT_6379_TCP_PORT=6379
REDIS_MASTER_PORT_6379_TCP_ADDR=10.96.1.23
DNS
这是k8s官方强烈推荐的方式,可以通过cluster add-on方式轻松的创建KubeDNS来对集群内的Service进行服务发现
修改kube-proxy模式为ipvs(默认为iptables)
加载内核模块(ipvs对内核版本有要求,如太低需升级)
[root@k8s-master ~]# lsmod |grep ip_vs
ip_vs_sh               12688  0
ip_vs_wrr              12697  0
ip_vs_rr               12600  0
ip_vs                 145458  6 ip_vs_rr,ip_vs_sh,ip_vs_wrr
nf_conntrack          139264  9 ip_vs,nf_nat,nf_nat_ipv4,nf_nat_ipv6,xt_conntrack,nf_nat_masquerade_ipv4,nf_conntrack_netlink,nf_conntrack_ipv4,nf_conntrack_ipv6
libcrc32c              12644  3 ip_vs,nf_nat,nf_conntrack
修改kube-proxy配置文件,/opt/kubernetes/cfg/kube-proxy-config.yml
[root@k8s-master cfg]# cat kube-proxy-config.yml
...
mode: ipvs
...
重启服务并查看模式
[root@k8s-master cfg]# systemctl restart kube-proxy.service
[root@k8s-master cfg]# tail -f /opt/kubernetes/logs/kube-proxy.INFO
...
I0214 16:07:02.857372   24866 node.go:172] Successfully retrieved node IP: 10.105.29.184
I0214 16:07:02.857407   24866 server_others.go:142] kube-proxy node IP is an IPv4 address (10.105.29.184), assume IPv4 operation
I0214 16:07:02.859293   24866 server_others.go:182] DetectLocalMode: 'ClusterCIDR'
I0214 16:07:02.859306   24866 server_others.go:258] Using ipvs Proxier.
E0214 16:07:02.859442   24866 proxier.go:389] can't set sysctl net/ipv4/vs/conn_reuse_mode, kernel version must be at least 4.1
I0214 16:07:02.860209   24866 proxier.go:442] nodeIP: 10.105.29.184, family: IPv4
W0214 16:07:02.860239   24866 proxier.go:445] IPVS scheduler not specified, use rr by default
I0214 16:07:02.860295   24866 proxier.go:500] ipvs(IPv4) sync params: minSyncPeriod=0s, syncPeriod=30s, burstSyncs=2
I0214 16:07:02.860472   24866 server.go:650] Version: v1.20.4
I0214 16:07:02.860824   24866 conntrack.go:52] Setting nf_conntrack_max to 131072
...
安装ipvsadm
[root@k8s-master ~]# yum install -y ipvsadm
[root@k8s-master ~]# ipvsadm -L -n
IP Virtual Server version 1.2.1 (size=4096)
Prot LocalAddress:Port Scheduler Flags
  -> RemoteAddress:Port           Forward Weight ActiveConn InActConn
TCP  10.96.0.13:81 rr  (轮询规则)
  -> 10.244.1.74:81               Masq    1      0          0
  -> 10.244.2.6:81                Masq    1      0          0
  -> 10.244.3.8:81                Masq    1      0          0
TCP  10.96.0.229:9090 rr
  -> 10.244.3.95:9090             Masq    1      0          0
TCP  10.105.29.184:30080 rr
  -> 10.244.3.93:8080             Masq    1      0          0
TCP  10.105.29.184:30095 rr
  -> 10.244.1.70:9411             Masq    1      0          0
...
系统生成虚拟网卡kube-ipvs0
[root@k8s-master ~]# ip a|grep ipvs0
78326: kube-ipvs0: <BROADCAST,NOARP> mtu 1500 qdisc noop state DOWN group default
    inet 10.96.0.229/32 scope global kube-ipvs0
    inet 10.96.0.235/32 scope global kube-ipvs0
...
svc的流量被ipvs分发
[root@k8s-master ~]# kubectl get svc|grep web-svc
web-svc                NodePort    10.96.0.69    <none>        80:30746/TCP      51s
[root@k8s-master ~]# curl 10.96.0.69
...
<title>Welcome to nginx!</title>
...
[root@k8s-master ~]# kubectl get ep|grep web-svc
web-svc                10.244.1.91:80,10.244.1.92:80,10.244.2.53:80                     79s

#ipvs捕捉到svc的流量
[root@k8s-master ~]# ipvsadm -L -n
...
TCP  10.96.0.69:80 rr
  -> 10.244.1.91:80               Masq    1      0          0
  -> 10.244.1.92:80               Masq    1      0          1
  -> 10.244.2.53:80               Masq    1      0          0
...
 微信
微信
 支付宝
支付宝